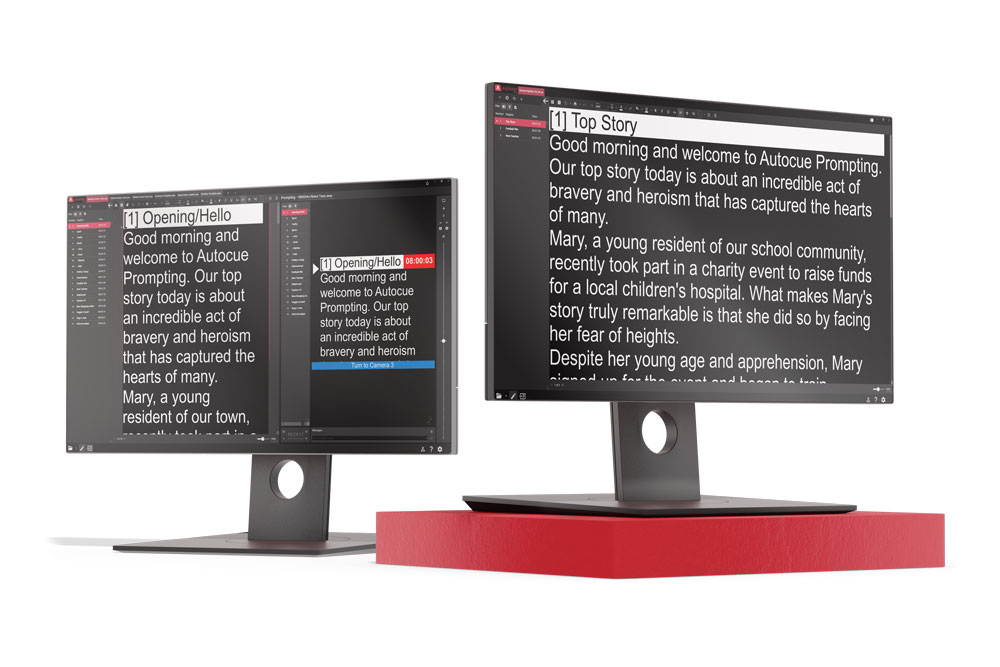
If you are looking for professional teleprompter software then you have come to the right place. With over 55 years in the teleprompter industry we have developed our own series of prompter software solutions which work with both Mac and PC. Our software works with any teleprompter from any manufacturer.
Featuring various control options you can use your keyboard numbers or arrow keys, mouse or even ShuttleXpress to control the software with ease. Each version comes with dual screen functionality that reverses the script for reflection in the prompt monitor but keeps it the right way round on the computer.
You can also import QStart, .doc, .rtf and .txt files. You are not restricted to just one format and there is built in formatting and search functionality. You even have the ability to set markers in the script and assign keys to them.
Please note: an internet connection is required to register the license when first installing the software
QStart prompter software comes equipped with dual-screen functionality that can be used with any teleprompter made by any teleprompter manufacturer.
The QPro prompting software is a robust software-only application designed for Professional shoots, without the need for live edits or newsroom interfaces.
Our revolutionary QMaster software runs on a PC/ laptop, connecting to a compact external hardware component called the QBox via Ethernet (wired or wireless), serial or USB.
A. In order to output correctly to two monitors you will need to enable multiple displays.
1) Close QStart if it is currently running
2) Right-click the desktop
3) Select “Properties”
4) Once the new box presents itself, click “Settings”
5) Make sure it is set to “Extend my Windows Desktop onto this monitor”. (see attached screenshot “WinDisplayPropsMultipleMonitors.png”)
*If you don’t see a #1 and #2 screens as pictured in the screenshot your computer is not picking up the external monitor. Make sure the external monitor is set to VGA input (*If the monitor allows multiple inputs, i.e. composite input) and that cables are securely plugged in on both ends.
7) Click “Apply”
8) Click “Ok”
9) Check to see if the screen is now showing up on the other monitor- if so you have succeeded!
1) Close QStart if it currently running
2) Right-click on the desktop
3) Select “Screen Resolution”
4) Make sure the #1 and #2 monitors are coming up.
5) Click the drop-down down arrow next to “Multiple displays” and select “Extend these displays”. (see attached screenshot “Windows7 extended desktop.jpg).
*If you don’t see a #1 and #2 screens as pictured in the screenshot your computer is not picking up the external monitor. Make sure the external monitor is set to VGA input (*If the monitor allows multiple inputs, i.e. composite input) and that cables are securely plugged in on both ends.
6) Click “Apply”
7) Click “Ok”
8) Check to see if the screen is now showing up on the other monitor- if so you have succeeded!
1) If you are currently prompting, press “Escape” (ESC) on your keyboard. If not proceed to step two.
2) Click on the wrench icon to enter options.
3) Refer to the image below for a visual representation of all possible configurations.
4) Click “Ok”
5) Start prompting again and any changes you made will now take effect. You may want to experiment to determine what works best for you.
A. There are two approaches to consider when optimizing QStart on less capable hardware. The first involves adjusting the display sensitivity slider under QStart’s options.
The second method involves reducing the resolution and number of colors under Window’s display settings.
1) If you are currently prompting, press “Escape” (ESC) on your keyboard. If not proceed to step two.
2) Click on the wrench icon to enter options.
3) Click on the tab under that box that says “Display Sensitivity”.
4) Click and hold in order to move the slider to the left. Then press OK and prompt.
1) Right-click on the desktop
2) Select “Properties”
3) Once the new box presents itself, click “Settings”
4) Once you have the display settings window up, adjust the resolution down to 800x600 by moving the slider as far to the left as possible.
5) Click “Apply”
6) Click the down arrow under “Color Quality” and change the setting to “Medium (16 bit)”
7) Click “Apply”
8) Click “Ok”
9) You have now optimized your display settings as much as possible for the ability of your machine! If performance is still unacceptable consider upgrading to a more powerful computer that can handle dual-monitors effectively for prompting.
a. You can also contact our sales team for an upgrade to QPro if the output on just one monitor is smooth while the other isn’t. QPro will allow you to run in a copy-cat mode where the same screen appears on both and because of this your computer will no longer have to do double the work (this is not offered in QStart because it requires a broadcast standard monitor that features a hard-flip switch to flip the display).
A. There are two approaches to consider when optimizing QStart on less capable hardware. The first involves adjusting the display sensitivity slider under QStart’s options.
The second method involves reducing the resolution and number of colors under Window’s display settings.
1) If you are currently prompting, press “Escape” (ESC) on your keyboard. If not proceed to step two.
2) Click on the wrench icon to enter options.
3) Click on the tab under that box that says “Display Sensitivity”.
4) Click and hold in order to move the slider to the left. Then press OK and prompt.
1) Right-click on the desktop
2) Select “Screen Resolution”
3) Click the down arrow on the same row as “Resolution” and select the lowest (bottommost) resolution you can.
4) Now let’s click “Advanced settings”
5) Click the tab under that box labeled “Monitor”
6) Underneath “Colors” you will see a drop down that selection that you can click.
7) Click the down arrow and make sure “High Color (16 bit)” is selected.
8) Click “Apply”
9) Click “Ok”
10) You have now optimized your display settings as much as possible for the ability of your machine. If performance is still unacceptable consider upgrading to a more powerful computer that can handle dual-monitors effectively for prompting.
a. You can also contact our sales team for an upgrade to QPro if the output on just one monitor is smooth while the other isn’t. QPro will allow you to run in a copy-cat mode where the same screen appears on both and because of this your computer will no longer have to do double the work (this is not offered in QStart because it requires a broadcast standard monitor that features a hard-flip switch to flip the display).
1) If you are currently prompting, press “Escape” (ESC) on your keyboard. If not proceed to step two.
2) Click on the wrench icon to enter options.
3) Click on the tab under that box that says “Prompt Monitor”.
4) Click the box so that the prompt monitor is enabled.
5) Enter in a custom size with valid sizes of 1-100 (1% will be too tiny to see so it is recommended to go to at least 20%). If you want it to take up the whole screen enter in the value “100” or click “Full Screen”.
1) If you receive this error you will need to ensure you are running QStart from an administrative account and that QStart is set to run as an administrator.
2) To enable running QStart as an administrator right-click on the QStart icon on your desktop.
3) Select “Properties”
4) Select “Compability”
5) Check the box next to “Run this program as an administrator”
A.QStart will run in evaluation mode if the dongle is not installed correctly. Make sure the dongle (looks like a USB flash/thumb drive) is plugged into the computer.
If the dongle is plugged in and QStart is still stuck in evaluation mode then try plugging the dongle into a different USB port located elsewhere on the machine as pictured below.
If you are still unsuccessful please email us at softwaresupport@autocue.com and we will be glad to walk you through reinstalling the driver to alleviate this issue.
Software support for teleprompters, scripting, newsroom and video servers is available immediately during working hours from any of our offices (London & New York). You can call any of these support teams, regardless of where you purchased your system.
Office Hours are as follows:
09:00 to 18:00 (GMT)
09:00 to 17:00 (EST)
In addition we provide 24-hour support for those customers covered by an annual maintenance agreement.
Out of hours help can be obtained by calling, choosing the Support option given by the answering system, and then leaving a message including a clear contact name and number and a description of the problem. An engineer will call back within a few minutes.
Software support for Teleprompters, scripting, newsroom and video servers is available immediately during working hours from any of our three offices (London, New York & Charlotte). You can call any of these support teams, regardless of where you purchased your system.
A. Glass should be carefully removed from the hood and cleaned in warm soapy water, or using a non-abrasive detergent. If you use a standard glass cleaning product, you will remove the reflective coating on the glass and it will need replacing.
A. The latest release build of all our teleprompting, scripting and newsroom software can be found in the downloads section. Please contact your local support team to request the password.
A. Our Master and Professional products are sold through a dealer network. To find you local dealer, please go to the contact page and click on "Find your local dealer". If you are unable to find a dealer near you, please contact our sales team directly who will be able to help. Our Starter Series products can be purchased directly through this website or over the phone, and they can also be purchased from your local dealer.
A. All our Master Series monitors carry an extended 2-year warranty. All our Professional Series monitors, Starter Series monitors, controllers and other hardware carry a 1-year warranty. All metalwork carries a 3-year warranty. Software support is provided free of charge during office hours to our Prompting & Presentation customers for the lifetime of the product.
A. In the first instance, you should contact your local dealer who will be able to provide first line support. If you purchased directly, or need to contact us directly, you should contact hardwaresupport@autocue.co.uk for all hardware related issues, or softwaresupport@autocue.co.uk for all software related issues.
A. The pin outs are 2.3.4.5.7 on a 9-way D socket.
A. The pin outs are 2.3.4.5.7 on a 9-way D socket
A. The pin outs are 9.10.11.12 on a 15-way D plug.
A. The pin outs for the serial line are 2.3.4.5.7 on a 9-way D socket. The pin outs for the IMT line are 1.5.6.9 on a 9-way D plug.
A. The pin outs are 1.5.6.8.9 on a 9-way D plug.
A. The pin outs are 1.4.5.6.9 on a 9-way D plug.
A. The standard length of the foot control cable is 8m but it can be extended to a maximum of 100m on request.
A. The standard cable length is 1.5m but it can be extended to a maximum of 100m by request.
A. The standard length is 25m - this can be extended by request.
A. The standard cable length is 10m - this can be extended by request.
A. 10K.
A. 100K
A. 10K.
A. 470K.
A. The filter factor of the teleprompter glass is 0.5 of a stop.
A. The blue dot in the corner of the glass should face the presenter.
A. The pin outs for the cue light are 1 and 3.
A. The voltage and current of the cue light is 12v 3w.
A. The pin outs for the cue light sensor are 1 and 2.
A. The pin outs for the D.C input are +v4 and -v1.
A. No - the serial foot control has a different drive card and wiring to the others.
A. Open a command prompt and ping the QBox by its IP address. Make sure you get a response. Type this command: arp –a {QBox IP address} (For example: arp –a 208.152.199.201) This will return the mac address.
A. If using a QBox, you will require a QBox with r2 firmware. Please also ensure you have bi-directionality setting on.
A. The setting 'Use temporary file for scroll buffers' needs be on (within Tools>Options>Prompt Engine>Settings)
A. -Enable Zero-Conf (local probe) mode on QBox -Make sure PC or laptop is set to DHCP -Plug up crossover cable (or straight-thru with crossover adaptor) -Restart QBox and after reboot note IP address (should start with 169.254.x.x) and Hostname -Add this IP address into the PC hosts file along with the Hostname apppended with .local (eg. QBox0084.local). Use the localhost line in the hosts file as a guide to formatting. -In QMaster 1.5 when defining your QBox use the Hostname.local data rather than the IP address. -You should now be able to connect and prompt.
A. If text that has been marked as 'Not Prompted' within ENPS rundown yet appears on the prompter regardless check 'follow ENPS commands' is selected within the ENPS interface options.
A. QPro will work with any Unicode 2.0 compliant language.
A. Tools->Options->Single Column Editor Prefs.
A. Tools>Options>Prompt Engine>Settings.
A. Tools>Options>File Based Queues>Single-column Defaults, click choose font, select font and restart QPro.
A. Tools>Options>Prompt Engine>Calibration. Click on Free, put your mouse on the red line and adjust it accordingly. Also ensure your PC's screen resolution is set to no higher than 800 x 600 and 256 colours.
A. Tools->Options->Prompt Engine->Settings, adjust the width and test it. Note: Width will be grayed out if “No cue marker” is selected.
A. Yes, Tools->Options->Startup->Open New Runorder (uncheck this option).
A. Go into Tools->Options->Scroll Controls. Highlight “standard” and click Delete. Click Add, type in a name and choose the appropriate controller. Keep the defaults and test the scroll control. If you have multiple COM ports on your pc you may need to test each port. You must delete the scroll control and restart QPro each time you want to test a different COM port.
A. This can be accomplished by selecting all text (Ctrl A) and toggling the case by pressing the Toggle Case button in the menu bar (a=A). You can also use the quick key command Alt F3 for all caps and Alt F2 to return to sentence case. These commands and shortcuts can be found under the FORMAT menu found at the top of your QMaster program window.
A. Be sure to separate phrases and sentences in a paragraph with returns. If you can separate the beginnings and endings with spaces, it will make it much easier to read. Also take care to put more spaces at the end of an item - this will prevent the presenter from continuing to read when the item has come to an end.
A. Using a sans-serif font is highly recommended. It cuts down the visual clutter and when combined with the all-caps presentation, the script is very easy to read and is very standard across the industry - including videotape, news and live-event productions. Sans-serif means 'without feet'. Examples include Arial, Tahoma, Veranda.
A. There is no standard font size in the industry. Be sure to check the actual output of the prompter monitor so you can estimate the required font size for the application. Remember that font sizes that are too big will cause scroll speed issues for you as well as contextual issues for talent. Also keep in mind that offering fewer options can keep your job from becoming unnecessarily complicated- more likely than not, if it's good enough for you it will be good enough for talent. If it isn't good enough, talent will tell you and you can then make necessary adjustments. Adjust font size by clicking the font button (TT) on the menu bar or use the quick key combination Ctl F.
A. Standard color is white text on black background. If talent has trouble with white on black, try yellow on black (this is the highest contrast color combination for the human eye). You can do this very quickly by using the quick keys Alt A to select all text and Alt 4 to change the text to yellow.
A. Inverse colors are usually used to display production cues that should not be spoken. These cues would include: - Item Title - Talent Name - Next Camera - Mark SOT or Video Clip You can invert text by selecting the word and pressing the inverse toggle button on the menu bar (AA) or by using the quick key Ctrl E. If talent prefers to read black text on a white background, use the command PROMPT -> INVERT COLOURS.
A. Most prompter operators reduce the size of the font for large words so that they fit on a single line. Alternatively, you can toggle the word into lower case or you can hyphenate. Note that a hyphen will show up on the second line and has limited use.
A. A cue timer is useful for ad-libbed segments. An example is an interview or an award acceptance speech. This will count down a pre-determined time and will display a message at the end. You can invoke this cue timer by clicking the white clock on the menu bar and start the countdown by clicking the red clock on the menu bar.
A. QMaster allows editing text while in the middle of prompting. The first step is to unlink the edit pane from the prompt video output. This can be done by clicking the Prompt Tracking button on the menu bar. You can then open any story in the edit window independently from the position of the on-camera prompt output.
A. Yes. FILE -> PROPERTIES -> BANNER Tab -> Uncheck ENABLED
A. See our software tutorial on queues and skeletons: https://www.autocue-qtv.com/autocueppvid
A. Please see our software tutorial on changing the default pane for editing scripts: https://www.autocue-qtv.com/autocueppvid
A. Scale the output of the QBox at this menu selection: TOOLS -> OPTIONS -> PROMPT ENGINES -> PROMPT SETTINGS
How to have edit screen appear in different pane when double clicking story link.
Autocue QTV Software Tutorial (Creating Queues and Skeletons)
Please click the link dependant on your hardware.
For software support queries please click to email the team.
(Autocue.com is not responsible for the content of external websites. This link will open a new window.)